Source: Lotus West
Author: James Scherer
Date:
Title: KONIS FOR YOUR EUROPA
LW# 54WS089
KONIS FOR YOUR EUROPA
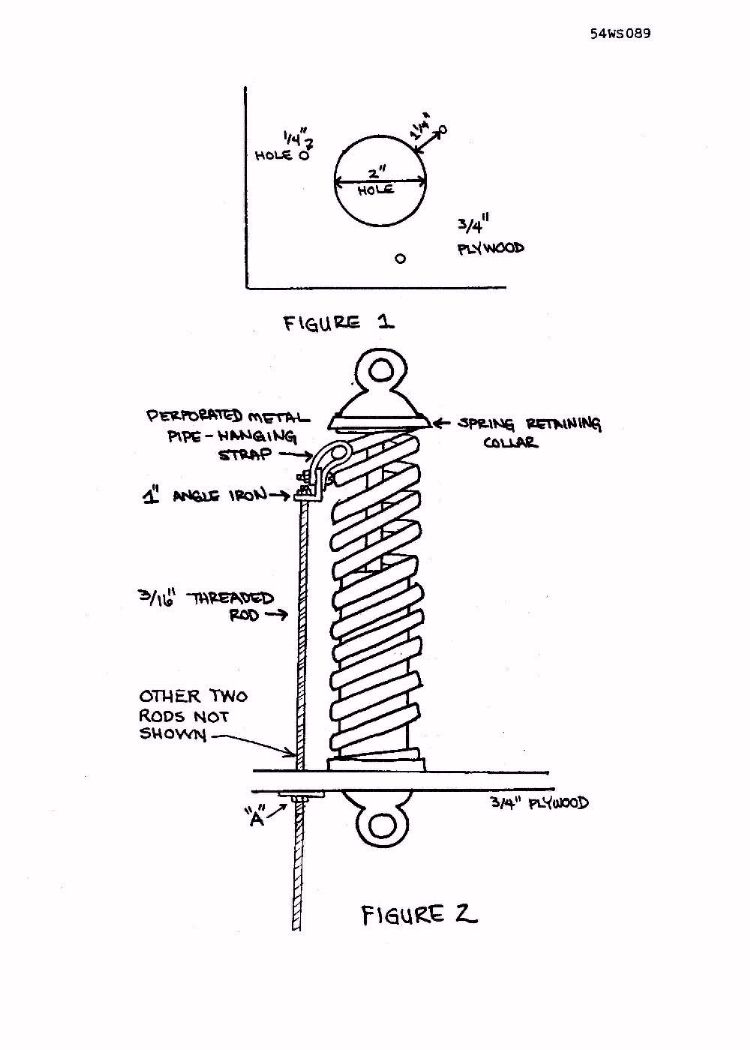
SPRING REMOVAL AND REFITTING - An easy, inexpensive and safe way to remove springs from shock absorbers is shown in Figures 1 and 2. Tightening up on the three nuts marked "A" (only one of which is shown in the diagram) compresses the spring, allowing the spring retaining collar to be removed. The "A" nuts are then loosened until the spring is fully extended, and, finally, removed to allow the spring (with the three rods still attached) to be removed from the shock. Position the new shock in the hole and reverse the foregoing procedure. One hint: When installing the springs on the new shock, be sure the upper and lower shock mounting 'eyelets' are parallel before releasing spring tension onto the re-positioned spring-retaining collar.
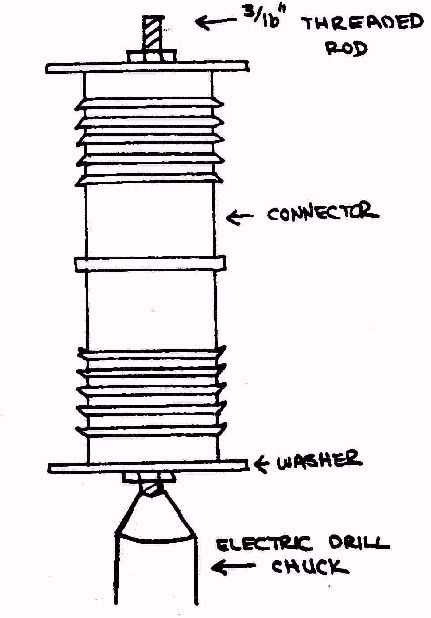
PREVENTING BOWING OF SPRING - The body of Koni shocks is smaller in diameter than the stock shock absorber, which itself has a diameter very close to the inside diameter of the coil spring. The narrower Koni body allows the spring to bow when it is compressed, which causes it to rub on one side of the body of the shock. This problem can be remedied by adding a 'sleeve' over the body of the Koni shock to increase its diameter to just under the inside diameter of the spring. There are undoubtedly a number of ways to do this; the following is what I came up with. At a hardware store look for the indoor household plastic plumbing pipe section, and, specifically, for the plastic connectors used to join two straight pieces of pipe. These are about 6 inches long and come in a variety of diameters. Take your Konis with you and select a connector with an inside diameter that will fit over the body of the shock absorber. I found that there were two such connectors: one a loose fit, and one a very tight fit (more on this, later). The outside of these connectors have a series of serrated rings around them, making them too large to fit inside the coil spring. However, they may be easily 'turned down' by using a hand-held electric drill as shown in Figure 3. Mount a coarse file or rasp in a vise.and grind away - the plastic is soft - until it slides easily inside the spring. (Note: In lieu of the top washer in Figure 3, the 2 inch diameter piece of plywood cut out in Figure 1 may be used. This will fit inside the spring and allow you to check whether the connector has been turned down sufficiently without having to remove it from the drill.)
If you chose the loose fitting connector mentioned above, it should be glued to the body of the shock or it will tend to ride up. Silicone glue works well. If you chose the tight fitting connector, put a film of oil on the body of the shock. Heat up the connector over the kitchen range until it is just too hot to handle comfortably (careful! It has a relatively low melting point.) Then quickly push it onto the shock while it is still hot and soft.
Approximately one and a third connectors are needed to completely cover the body of each shock, although one connector alone will prevent bowing. If you put on one and a third connectors, put the one-third piece on first. Coat the connector with grease before installing the spring.