Source: Lotus West
Author:
Date: 1978
Title: EUROPA BRAKE MAINTENANCE and REPLACEMENT (All Models)
LW# 54WS097
There are three ways to stop your Lotus. They are engine braking, your brake system (proper method), and by impacting another object. If your car runs well but doesn't stop well, it is of little use. This article is an attempt to cover the finer points of standard maintenance of your braking system.
IMPORTANT: NEVER, REPEAT NEVER, USE ANY BRAKE FLUID WHICH IS NOT GIRLING APPROVED. YOU WILL DESTROY YOUR SYSTEM WITH DOT 3 FLUID. The fluid will have printed clearly on the container that it is Girling approved. Castro1 has-such.a fluid. You should check the level of your brake fluid on a regular basis (not less than every two months), for it will give you an early warning of failure. If you have to add fluid frequently, it is leaking out somewhere. You should carefully examine all wheel pistons, cylinders, and hoses. If you cannot detect a leak, you must also check the servo assist units.
Disk pads and shoes will wear away slowly under normal conditions. Checking the pads and shoes every 5000 miles or so, but never longer than 6 months, will be safe. They should be/checked at once if you find the pedal height is low.
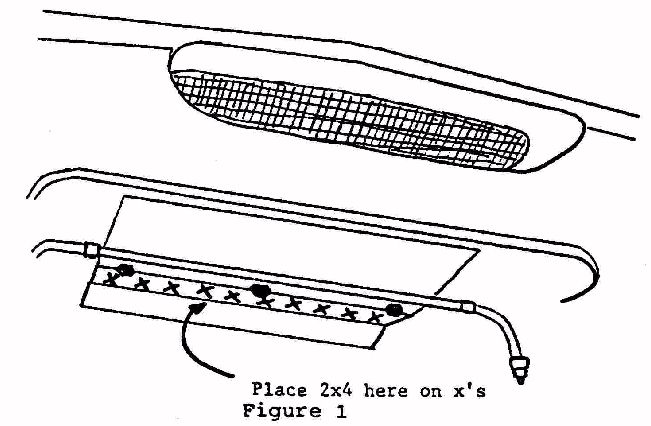
PAD INSPECTION and REPLACEMENT Remove the front wheels and support the car on a 2x4 placed on jack stands at the location indicated in Figure 1.
You can see both pads by looking through the opening at the rear of the caliper. They should not be used if less than 1/16" remains. It is far safer to replace the pads if they are worn to less than 1/8" than to try and save a few pennies at the expense of your Lotus (and your life). If in doubt replace them. While you are looking at the caliper assembly, carefully check the flexible hose. Clean any dirt off by rubbing it with a clean rag, then with a rag and isopropyl alcohol. Examine the hose for small cracks in the surface, paying special attention to the surface near the end fittings. A cracked hose should be replaced. Examine the entire caliper assembly for any fluid residue or mechanical damage. If all is in order, clean the caliper assembly (do not remove it) and the rotor with isopropyl alcohol until no more dirt comes off (within reason). This is very important of you live in areas where salt is used to melt road ice. While cleaning the rotor, turn it so that the pads will also be cleaned. Be generous with the alcohol. There is no adjustment of the pads, but check the rotor for looseness or wobble. Examine your shock for damage or leaking fluid. That's about it. Replace the wheel and do the disk on the other side.
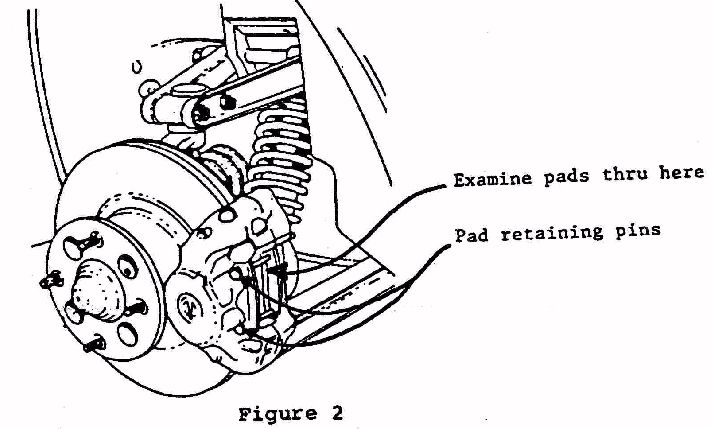
To replace the pads you SHOULD replace all four (they are sold in sets of four). After cleaning the caliper assembly, locate the two pad retaining pins shown in Figure 2. You will find a small Clip in each. Remove the two clips. The pins can now be pushed out. Push against the old pads to force the pistons back into their bores, allowing for the thicker new pads. This will raise the fluid in the master cylinder, so watch that it doesn't overflow. Remove the pads and shims and clean the area around the pistons carefully. Clean the new pads with alcohol and try to keep your hands off the pad surface. Fit the new pads and shims into the caliper assembly with the arrow on the shim pointing in the forward direction of wheel rotation. Replace the pins and clips. If you cannot see the clip holes you may have the pins in backwards. Try the pedal a couple of times to make sure all is working properly.
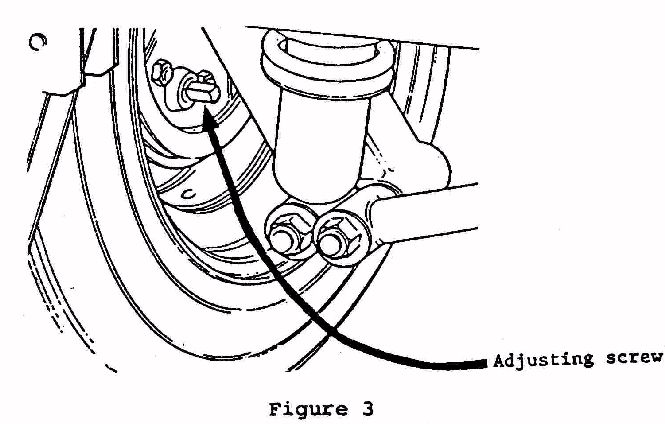
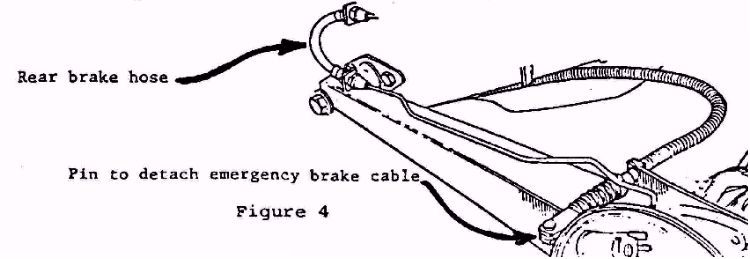
SHOE INSPECTION and REPLACEMENT Remove a rear wheel, supporting the rear of the car on short 2x4's and jack stands under the frame behind the axle. Release the hand brake. The drum can now be pulled off by hand. If it is stuck loosen the adjusting screw a number of turns, as shown in Figure 3. Tapping the drum with a rubber hammer may also help. Examine the shoes carefully. If they have worn to 1/16" from the rivets they must be replaced (play it safe: when in doubt replace them). Before cleaning the back plate and piston assembly look carefully for fluid residue. If it is leaking it must be repaired. Clean the shoes, back plate, piston assembly, adjusting assembly, hub, and drum with alcohol. You will notice that there is only one piston. This is on the side of the leading shoe, the first shoe to contact the drum. The trailing shoe is actuated by the entire piston assembly sliding in a slot in the backing plate. Check that the piston assembly can be moved. If not, remove the rubber boot on the back of the piston assembly. You will see two thin clips against the backing plate. Apply some rust penetrating oil to the clips. Using a rubber mallet tap the assembly back and forth until it moves with reasonable pressure. It may be necessary to pry the clips off and remove all rust and lubricate all the sliding surfaces. You do NOT have to remove the brake hose. Use care to not get any lubricant on the shoes and only a minimal amount on the backing plate (wipe it off with a rag.- there will still be enough. Now carefully inspect the rear brake hose for cracking, as with the front. The hose is on the end of the radius arm - see Figure 4. Replace if cracked. Check the drum for scoring and cracks (rare). If the drum is badly scored, have BOTH drums turned, ensuring that they are not turned to a greater diameter than the maximum specified by Lotus. Minor scoring can be removed by taking an emery cloth to the surface equally all the way around. Clean the drum with alcohol.
You may take this opportunity to inspect the bearings for visible damage, rotate the hub and listen for noise, and pull on the hub to check f6r play in the bearings. Inspect the rear shocks for damage and leaking. Check the lower link bushings for wear and damage.
Install the drum with the shoes in the loose position (adjuster backed out). It may be necessary to tap the shoes to get them centered. Before lowering the car check the pedal for proper operation.
It will be necessary to adjust the rear wheel shoes. After centering the shoes by pressing the brake pedal several times, turn in the adjusting screw while rotating the wheel in the forward direction. IT IS NECESSARY THAT THE HANDBRAKE CABLE BE LOOSE, AND IT MAY BE NECESSARY TO DISCONNECT IT AT THE LEVER BEHIND THE BRAKE BACKING PLATE (see Figure 4). When the wheel won't turn, back off the adjusting nut ˝ turn (TWO CLICKS by feel). Check that the wheel is not binding. If it is, back it off another click after centering the brake shoes with the pedal. If it still seems locked back it off another click. If this is no help something is wrong: Possibly the wheel cylinder is sticking or the springs have fallen off or are not on properly. Track it down. The brake pipe may be holding the brakes on or the cylinder may not be free to slide.
When replacing the shoes you should, again, replace all four. Before removing the shoes carefully note the position of the springs. If they are put in their proper places, but flipped, they may rub the hub. There isn't very much clearance. This will wear the spring through in a few miles. Grasp the retaining washer with pliers and push it in so it-can be rotated without turning the pin. Rotate the washer 90"so that it can be removed. Remove the spring and push the pin through the shoe. Repeat for the other shoe. See Figure 5.
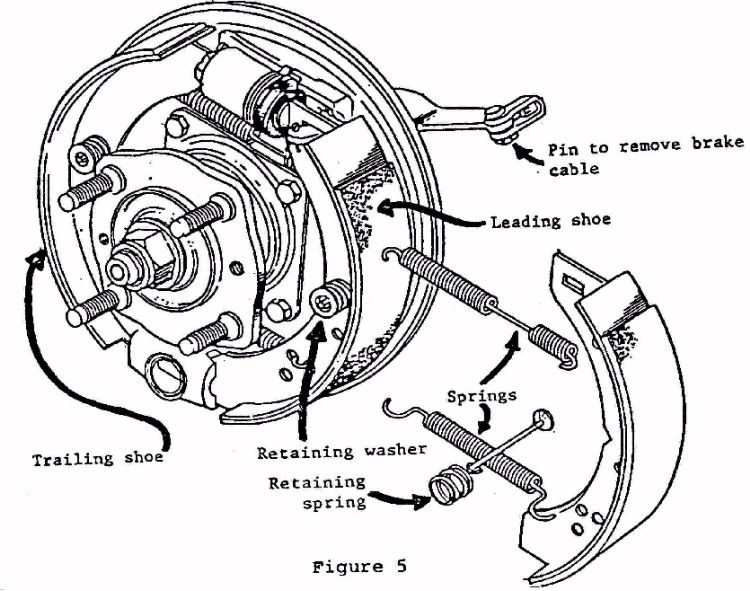
Again note exactly how the springs fit in (if necessary do one wheel at a time so you can check the other) and remove the springs. Clean the backing plate with alcohol. LIGHTLY apply a high-melting-point brake grease to the pivot points and where the shoe rubs the backing plate (wipe off excess - only a smudge is enough). Clean your hands with alcohol. Examine the new shoes. The longer surface is the leading shoe (one for each wheel) and MUST be installed on the side of the wheel that the piston is on. Assemble the springs and shoes. Replace them on the backing plate. Push the retaining pins through them. Install the retaining spring and washer. Back out the adjuster screw all the way, tap the shoes to center them, if necessary, and install the drum. Do you hear ANY scraping noises? If so remove the drum and find out what it is. Shoes against drum okay, but is it the springs? Are they on the right way? Install the wheel and adjust as described earlier. Don't forget to center the shoes by using the pedal a couple of times. Check the brakes for proper operation.
Adjusting the handbrake is a simple process, but many people don't know how. First, properly adjust the rear brakes. With the vehicle on the ground after you have centered the shoes by pressing the pedal several times you can begin. Pull the center armrest up and remove the foam-padding insert. You will see an oval access hole. With a flashlight, or droplight look into it. Under the shift linkage there will be a threaded rod with the brake cables attached. There are two nuts (one being a locking nut). Loosen the locking nut. Pull the hand brake out about 1˝". Now tighten the adjusting nut until you cannot roll the vehicle. That is, not when it just grabs but when it is actually locking the brakes. Release the handle. The wheels MUST turn freely. If not, readjust slightly. Tighten the locknut. Replace the foam rubber and armrest.
One item remains: What shoes and pads to use? There are no "Lotus" shoes or pads for the Europa.
PADS: ALL Europas from '68 through '76 Renault Engine, T.C., and JPS use the same Girling pads.
Lotus part #A074J0188Z = Girling part #GDB 533
The exact same Girling pads are used in the following vehicles:
Plymouth Cricket 1971-73 all EXCEPT GT & 1500
Triumph Spitfire MKIII & MKIV 67. and on
Lotus Elan $2, $3, $4, SE Sprint 64-73 (FRONT ONLY)
Super Seven T.C. 71-on
Europa S2, T.C., Special 68-76
Volvo REAR pads on GIRLING FITTED VEHICLES ONLY, 1800ES 71-73:
164 68-71: 142, 142S, 144, 144S 8/68-74: 145, 145S 9/67-12/69
(Note: not all vehicles had Girling brakes)
SHOES: Europa 68-71 S2 and T.C. used Lotus #X046J6002Z which is Girling part #64375010LK. This is the exact same shoe used in the Triumph GT6 1967-Sept 72.
Europa Special has another shoe, Lotus #A074J6044Z, which is Girling part #64937084ML, the same shoe as used in the Triumph GT6 Oct 72-73.
Note: The wheel pistons, adjuster, springs, etc. are from the GT6.
The caliper assembly and disc rotor are the Triumph Spitfire units.
David Krivoshik
Elizabeth, New Jersey
© Lotus/West Inc. 1978