Lotus Europa S2 Tapered Roller Bearing Rear Hub
Conversion
This is a simple method to change to tapered rollers. It is not intended to be a sophisticated setup. It has worked well on my car for about 25 years without any further maintenance or attention. As always, your actual mileage may vary.
When I performed this modification on my Lotus, I found a tapered roller bearing to almost directly replace the 62mm outer hub bearing, but I could not find a replacement for the 55mm inner bearing.
Welded hub carrier on my Type 65
I used (2) about 62mm Timken bearings (17118 cone / 17244 cup)
and welded the carrier to build up material around the inner bearing, then
bored the carrier to take the larger bearing.
The length of the bearing spacer inside of the hub controls bearing end float. The original stub axle and end nut are retained.
The inner end of the stub axle (u-joint side) was reduced from 31mm to 30mm. A 62mm OD inner seal replaced the 55mm OD seal. A simple seal mount was fabricated to hold an outer seal inside of the brake assembly. The outboard hub-to-bearing spacer and hub were modified to hold the spacer centered in the brake grease seal. It’s almost easy.
Newer Bearings Available
Before writing this description, I looked in the Timken On Line Catalog and found a bearing to replace the 55mm inner bearing.
D = OS diameter, d = axle bore diameter, W
= bearing thickness
OEM outer (wheel end) ball bearing D = 62mm, d = 30mm, W = 16mm
Timken tapered roller bearing X30206 cone / Y30206 cup D = 62mm, d = 30mm, W = 17.25mm
OEM inner (u-joint end) ball bearing D = 55mm, d = 31mm, W = 13mm
Timken tapered roller bearing X32006X cone / Y32006X cup D = 55mm, d = 30mm, W = 17mm
I have only looked up the dimensions on these bearings. I have not attempted the modification with the stock size inner bearing, but it should work fine and avoid most of the machining costs on my original setup.
I will describe the process using the newer parts. If anyone wants to use (2) 62mm bearings, the process is about the same, plus welding and some additional machining.
Machine Work
Once your parts have been disassembled, you will need these changes:
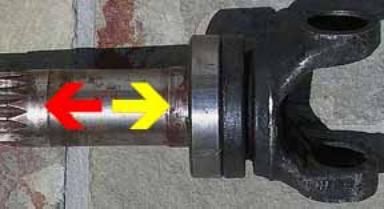 Stub
axles – Turn the inner bearing area (Yellow arrow) down to match the diameter
of the outer bearing area (Red arrow).
Stub
axles – Turn the inner bearing area (Yellow arrow) down to match the diameter
of the outer bearing area (Red arrow).
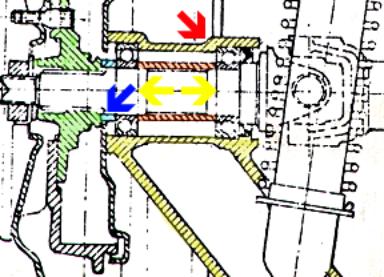 Hub
carrier - While the inner bearing area (u-joint end) will not require weld
build up and increasing the bore diameter, the depth of the bore for the inner
bearing will need to be increased by 4mm to compensate for the thicker bearing
if you want to avoid any increase in toe-in of the rear suspension. (Yellow section, red arrow)
Hub
carrier - While the inner bearing area (u-joint end) will not require weld
build up and increasing the bore diameter, the depth of the bore for the inner
bearing will need to be increased by 4mm to compensate for the thicker bearing
if you want to avoid any increase in toe-in of the rear suspension. (Yellow section, red arrow)
Bearing spacer – Assemble the bearings in the hub carrier. Be sure the cups are pressed in solidly and fully seated. Measure the distance between the bearing cones and make a new spacer this length, plus 2 or 3 thousandths of an inch to allow end float. (Orange section, yellow arrows)
Wheel hub and hub spacer – To keep grease from entering the rear brakes, you need to add a seal to the outside bearing. It will have to seal against the wheel hub spacer. (Blue section, blue arrow) Make a new spacer with a smooth outer surface and chamfer the hub end 45 degrees. Chamfer the inside of the hub to match the new spacer. This keeps the spacer centered in the seal.
The new outer bearing is also slightly thicker than OEM, about 1.25mm, which will move the brake drum away from the hub carrier. Set the length of the spacer to maintain the original hub to hub carrier distance if your brake shoes are already running right on the edge of the drum.
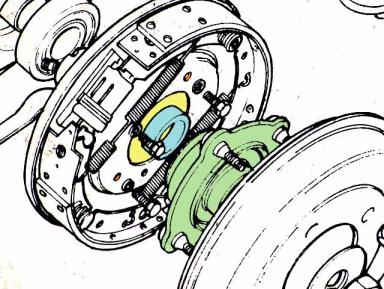 Outer
hub seals – Select a thin seal to match the diameter of the (Blue) new,
chamfered hub spacer (or make the spacer to match a pre-selected seal) and to
fit into the open center of the brake backing plate (Yellow opening). Bend small metal tabs to fit under the outer
radius arm/brake backing plate/hub carrier bolts (Orange holes) and clamp the
seal edges to the radius arm/hub carrier.
Outer
hub seals – Select a thin seal to match the diameter of the (Blue) new,
chamfered hub spacer (or make the spacer to match a pre-selected seal) and to
fit into the open center of the brake backing plate (Yellow opening). Bend small metal tabs to fit under the outer
radius arm/brake backing plate/hub carrier bolts (Orange holes) and clamp the
seal edges to the radius arm/hub carrier.
That’s about it. Quick and dirty, in the true Lotus style. Assembly is pretty much normal from here.
I have never been inside of the hubs on a Twink, but the principles would be the same, even if some dimensions are different.
The factory ball bearings can last a long time if the installation is perfect, but minor spacer or carrier damage or improper press technique can set them up for very early failure.
My bearing mod has held up well though years of pretty punishing driving. Of course, no warranty is expressed or implied, as the used car dealers say.